Data Extraction Overview
Overview
This section provides information on configuring data extraction.
The Extraction functionality allows you to extract Journals, Unposted Journals, Errors, Balances, and user-defined Entities (stored in FDS) automatically according to schedules defined by you to eliminate manual extractions. Extracted data can be later used by downstream services, for example, General Ledger.
Overview of Data Extraction Process
The below diagram illustrates the basic flow of the data extraction process in Fynapse.
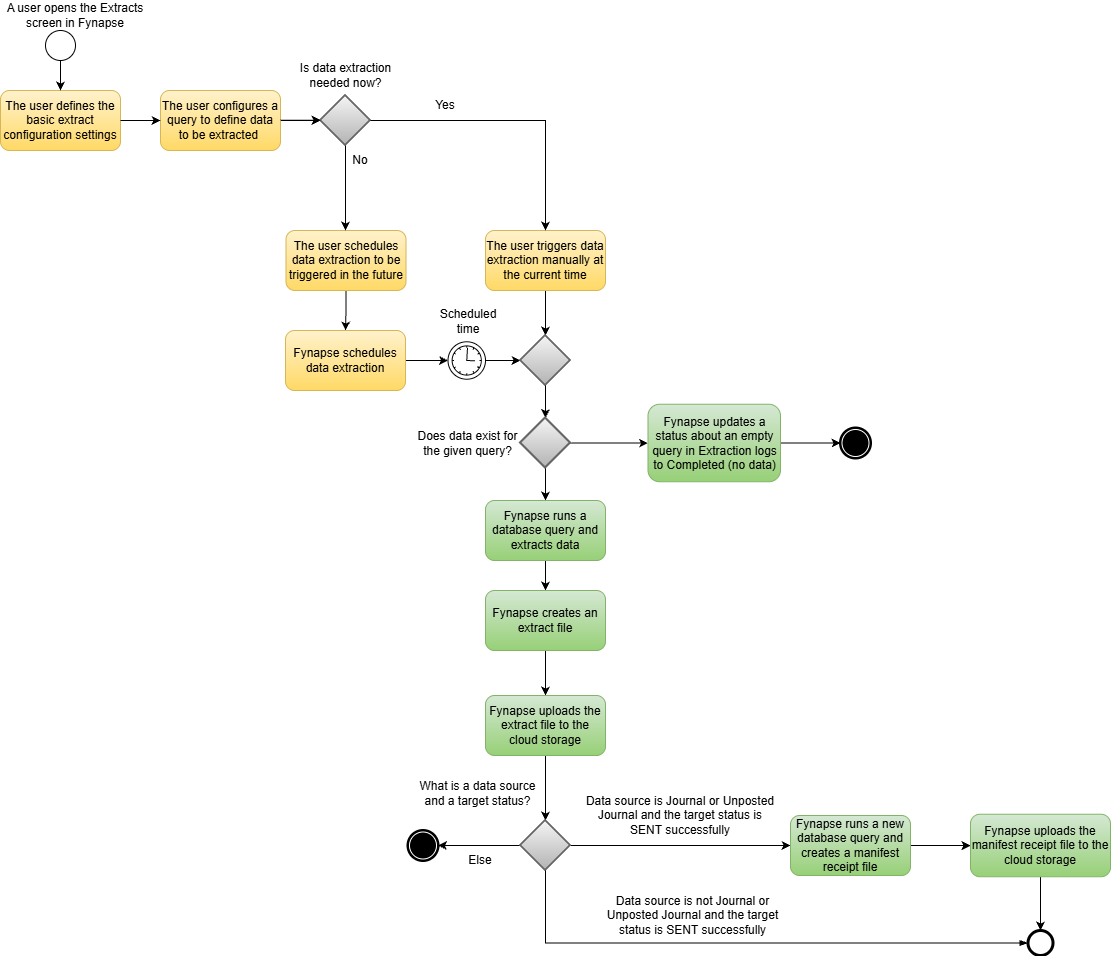
The below description adds more details to the data extraction process illustrated above by presenting this process from the Fynapse GUI perspective. The complete process can be achieved through Fynapse GUI by using three screens:
- The Extracts screen that displays all prepared extract configurations and lets you start defining a new configuration by clicking the Add button.
- The new extract configuration screen that enables you to create extract configurations that allow you to extract a particular type of data using a defined query and triggering this extraction at a specific point in time with a required frequency. Configuring a new extract involves five major steps, that is:
- Defining general settings such as a name, data source, and effective dates and time
- Defining if:
- All data available in Fynapse from the beginning up to the defined date and time should be extracted. This is achieved by not selecting the Extract only incremental data checkbox.
- Only new data (increments) starting from a previous run of the extraction process until a defined date and time should be extracted. This is achieved by selecting the Extract only incremental data checkbox.
- Data should be split into separate extract files according to the Posting Date attribute by selecting the Split per Posting Date checkbox (for Journals and Unposted Journals)
- Deciding if you want to aggregate data for Journals or Unposted Journals based on a selected Dimension Set while extracting data by selecting the Aggregate Journal data checkbox
- Building a particular data query to determine which data will be extracted
- Configuring a schedule according to which the extraction will be performed or disabling it by selecting the Disabled option and manually extracting data by clicking the Run now button.
- The Extraction Logs screen that presents a list of already run extracts, as well as the ones currently in progress.
Extraction Data Source
Data can be extracted from the following data sources:
- Journals
- Unposted Journals
- Errors
- User-defined Entities
- Balances
Extraction Outputs
As a result of an extraction process two files are created:
- An extract file that contains extracted data
- A manifest receipt file that contains information that allows you to detect data inaccuracy and incompleteness after data processing. It is created for extracting Journals and Unposted Journals. Read the below section to learn more about the manifest receipt file.
Manifest Receipt File
A manifest receipt file is:
- Automatically generated by Fynapse
- An independent accuracy and completeness check is performed as a separate database query once the extraction process is completed
- Created for each extract file containing Journals and Unposted Journals, successfully uploaded to the cloud storage
- Placed under the same path as the extract file for which it was created. To learn more about a path under which you can find both files, refer to the Extract Files Placement section.
File Format and Name
The manifest receipt file has the same:
- File format as an extract file, that is CSV but it has the .man extension.
- Name as the respective extract file built using the following syntax: a configuration name and a start date and time (UTC time). For example: daily_extract_2022-08-05_12-00-00.man
If you selected the Split per Posting Date checkbox, then the manifest receipt file name includes also the Posting Date after the configuration name. For example: daily_extract_2023-06-12_2023-06-13_12-00-00.
File Structure
The manifest receipt file contains the following information:
- DATA_FILE_NAME - the name of an extract file for which a given manifest receipt file was generated
- RUN_DATE - a date and time (based on the System Date in UTC time in the following format: YYYY-MM-DD_HH-MM-SS) when the respective extract file was generated
- NO_OF_RECORDS - a sum of records that was returned by running the same data query as for the respective extract file
- ENR_DR_CR_INDICATOR - information that a particular record is a debit record (DR)
- ENR_JOURNAL_AMOUNT - a sum of all transaction amounts for DR entries for the respective extract file
ENR_DR_CR_INDICATOR and ENR_JOURNAL_AMOUNT fields are used in the last two columns in the manifest receipt file. These two fields must be defined in Journal Line Definition and the data type used for ENR_JOURNAL_AMOUNT must be decimal or amount, otherwise the receipt manifest file will not be generated. Please contact the Aptitude Support Team if you want to use fields other than ENR_DR_CR_INDICATOR and ENR_JOURNAL_AMOUNT.
Extract Files Placement
All extract files with their respective manifest receipt files (the manifest receipt files are generated only for extract files containing Journals and Unposted Journals) are placed in a cloud storage, for example, Amazon S3, and can be found under the following path:
fynapse/Journal/extracted/FILENAME.csv
where:
- fynapse is a namespace
- Journal is an Entity name
- extracted is a folder name used by an extraction service
For example: fynapse/Journal/extracted/journal_extract_2023-03-01_10-00-00.csv
The name of the extract file is built using the following syntax:
- The name of an extract configuration that was used to extract particular data
- The date and time of the extract process start (UTC time)
For example: journal_extract_2023-03-01_10-00-00.csv
If the extract file is triggered via REST API, its data is presented in your API tool.
Types of Data Extraction
The Extraction functionality gives you the possibility to:
- Extract all data for a particular time period
- Extract only incremental data (i.e., only new data that was not extracted in the previous extraction process)
- Split data into separate extract files according to the Posting Date attribute for Journals and Unposted Journals
- Aggregate data for Journals or Unposted Journals based on a selected Dimension Set while extracting data
Extracting All and Incremental Data
The examples below illustrate how extracting all and incremental data works.
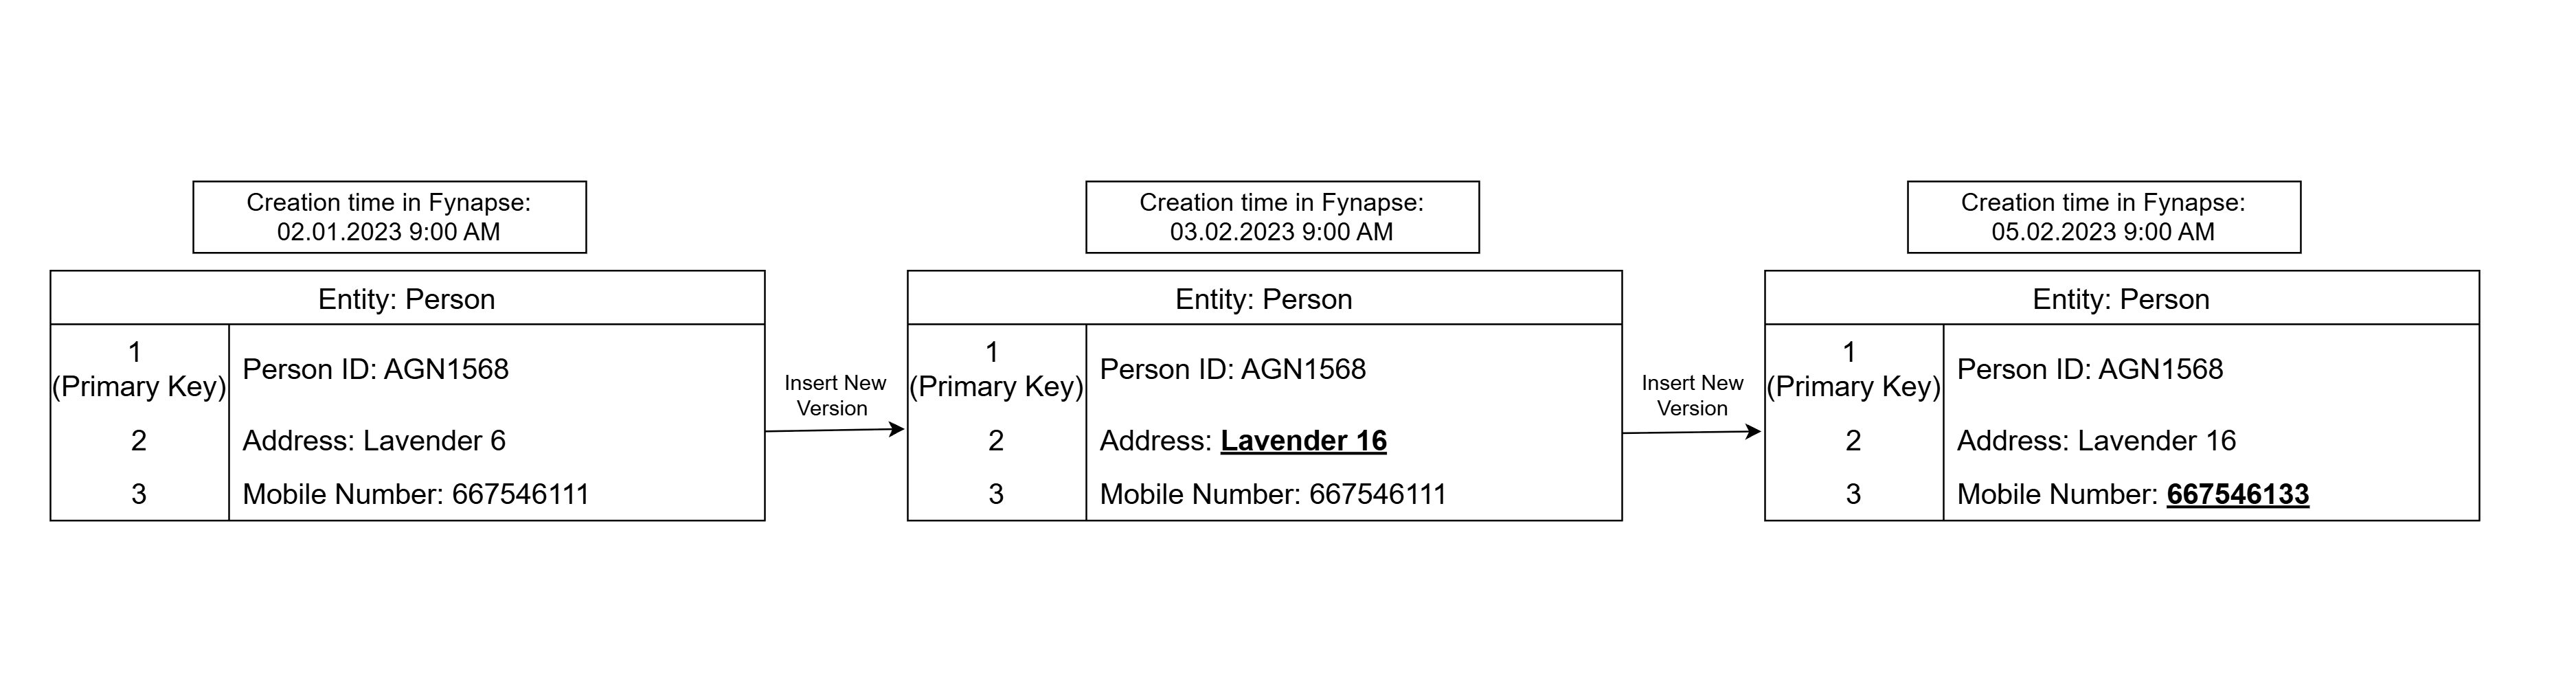
Example 1 with Incremental Data Option Disabled for User Defined Entities
Look at the example changes done to the Entity to understand which data will be extracted:
Example 2 with Incremental Data Option Disabled for Journals, Unposted Journals, and Errors
Example 3 with Incremental Data Option Selected for all Types of Data Source
Example 4 with Scheduler Selected for all Types of Data Source
Splitting Data into Separate Extract Files by Posting Date
Splitting data into separate extract files can be configured when Journal or Unposted Journals is selected as a data source. We recommend using the splitting option when an extract configuration is defined for incremental data to avoid extracting and splitting all data available in Fynapse from the beginning up to the defined date and time. Data is split according to the Posting Date attribute which is automatically identified by Fynapse so manual configuration is not required. For each extract file, a dedicated manifest file and an extract log are created. The name of the extract file and a dedicated manifest receipt file is built using the following syntax: a configuration name and a Posting Date and a start date and time (UTC). For example: daily_extract_2023-06-12_2023-06-13_12-00-00. To enable the splitting option the Split per Posting Date checkbox must be selected while configuring an extract configuration.
Look at the examples below to learn how splitting is performed.
Splitting When an Extract Configuration Includes Only New Data
If after triggering the extract configuration, Fynapse detects only new data, then this data is divided into separate extract files so that each extract file consists of one Posting Date, for example:
Splitting When the Extract Configuration Includes New Data and Some Data Left from the Already Extracted Posting Date
If after triggering the extract configuration, Fynapse detects not only new data but also data for the Posting Date that was extracted before (but for some reason some of the records were not included in this extraction), then this data is appended to the next extract file, for example:
Splitting When the Extract Configuration Includes Only Data Left from the Already Extracted Posting Date
If after triggering the extract configuration, Fynapse detects only data for the Posting Date that was extracted before (some of the records were not included in this extraction because they appeared after the extraction took place), then this extraction process will be canceled, and data will be extracted when the next extraction is triggered, for example:
Time Zone Support in Scheduler
To ensure proper work of a scheduler and guarantee that the extraction process will be triggered on configured dates and time regardless of the time zone in which you operate, some of the options available in the Day list when you select the Yearly and Monthly repetition options in the Scheduler panel are disabled. Additionally, there are some specific options available in the list:
- Last - means the last day of the month
- Last - 1 - means the last day of the month minus 1 day. For example, if you select this option for April it will always imply 29th. If you select it for February it can imply 28th or 27th depending on whether it is a leap year or not.
- Last - 2 - means the last day of the month minus 2 days
- Last - 3 - means the last day of the month minus 3 days
- Last - 4 - means the last day of the month minus 4 days
Look at some configuration examples to understand how it works.
Configuration Example 1
Let’s assume that you want to run your extract configuration monthly always on the last day of the month, then you need to select the Last option from the Day list.
Configuration Example 2
Let’s assume that you want to run your extract configuration yearly in February, March, and April on 29th then you need to select from the Day list for:
- February - Last
- March - Last - 2
- April - Last - 1